


|
Bellieni Jumelle stéréoscopique |
Manufactured or assembled in France from 1895 to (After) 1895.
Index of rarity in France: Rare (among non-specialized garage sales)
Inventory number: 16055
See the complete technical specifications
Chronology of cameras Bellieni
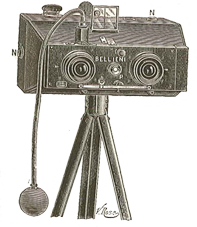
This stereoscopic Bellieni trapezoïdal camera (No. 95 on the back, 93 on the body) uses independent 8 x 9 plates. The left window is equipped with small teeth for pairing alignment.
It is constructed on the same body as the mono 8x9 cm trapezoïdal camera.
This model allows for 18 single views or 9 stereoscopic pairs. It cost 500 francs in 1898, plus 2 francs for the "addition of a spherical level notched in the binocular." There was also a version for 24 views, priced at 515 francs.
The focus can be adjusted up to 1.5 meters by a lever that operates two helicoids around the lens mounts. The guillotine shutter is accompanied by a small rotating flap for smoother triggering.
It allows for Bulb (P) and five instantaneous exposures regulated by a brake. Cocking is done by a large button on the front. The iris diaphragms are coupled by a linkage and graduated according to the old Zeiss notation: 162 128 64 32 16 8, where 162 corresponds to the full aperture F:8.
The lenses can be unscrewed for cleaning, and a divergent lens can be inserted to achieve a telephoto effect.

DESCRIPTION OF THE STEREOSCOPIC JUMELLE (from the Annuaire général et international de la photographie of 1898)
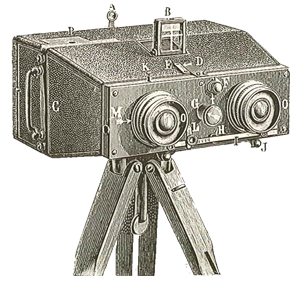 |
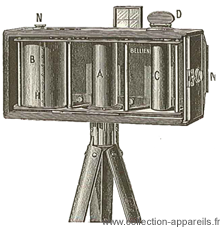
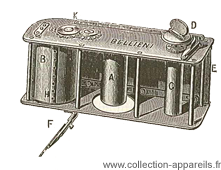
A - Foldable eyepiece that can be flipped over the cover. |
|
Format. — The stereoscopic Jumelles produce images with dimensions of 8 x 9. This format allows for positive prints measuring 75 mm on each side, which is the standard size for commercial positives. Consequently, they can be viewed in stereoscopes found everywhere.
Volume and Weight. — The Jumelles are as compact as possible, only exceeding the thickness of the plates used by a small margin. As for weight, the instrument loaded with its 48 plates only weighs 2 kilograms.
Lenses. — Two identical lenses from the Zeiss 1/8 series are used. They have a focal length of 110 mm. The frames are made of aluminum, and they feature iris diaphragms. These lenses are used with the original manufacturer's mount, preserving all their qualities of centering and perfection. The optical axis of each lens passes through the center of the corresponding plate, ensuring the same image extent on each side.
Iris Diaphragms. — They are linked by a light rod that can be fixed at any point in its course using a spring clamp with a nut. Additionally, the rod is clearly engraved with divisions identical to those on the iris rings. This provides the ability to instantly modify the apertures and ensures they always remain identical. It is easy to detach the rod with a simple press and obtain different apertures, if desired in specific cases.
Focusing. — It is done instantly using two conjugated helical grooves. This arrangement ensures identical focusing of both lenses. The distance scale, placed under the operator's eyes, accurately represents the respective distances of the objects to be reproduced.
Shutter. — It is located behind the lenses, ensuring very high efficiency. All active light rays are used with any aperture, and this arrangement introduces no modifications to the lens assembly that could affect their optical qualities. The shutter offers variable speeds, allowing for fast or slow snapshots and timed exposures, either by bulb or manually. The shutter consists of two parts:
1° The main shutter, which operates by the passage of slats with suitable openings behind the lenses.
2° The safety shutter, a simple flap activated by the trigger button, designed to arm the shutter without exposing the lenses.
Shutter release. — It occurs in two stages, similar to the double-set trigger of precision shooting firearms.
Viewfinder. — It consists of a concave lens with a reticle. A sighting eyepiece, fitted to the back of the Jumelle, eliminates parallax and ensures perfect alignment, providing the exact field of view of the lenses. In addition, a lens mounted in the eyepiece compensates for the negative curvature of the reticle with its positive curvature. This positive lens allows objects to be viewed in the viewfinder without any accommodation effort and with maximum sharpness.
Retraction. — It is very simple, and therefore, reliable and robust. It operates in all positions and with the same security, regardless of the number of plates loaded in the magazine.
Counter. — Activated by the retraction itself, it automatically indicates the number of exposed plates.
Handling the STEREOSCOPIC JUMELLE
 Loading the Magazine. — Loading the Jumelle should be done in very low red light.
1. Place the Jumelle on a table, with the instrument resting on the lenses and the handle to the right.
2. Slide out the grooved cover by pressing with your right hand on the small spring lock located on the side of the box. Place your left hand flat on the cover and slide it while continuing to press to keep the pads in place. Remove the pads and frames.
3. Place a photosensitive glass plate in each plate holder, gelatin side up.
4. Then, successively insert them into the left compartment, making sure to place the closed side of the frame against the partition between the two compartments.
5. Replace the pads and close the Jumelle.
Once the Jumelle is loaded, retract the first glass plate so that one plate is in front of each lens. The counter should then read 1. If it does not, after retracting the first plate, without pushing the handle all the way in, remove it as many times as necessary to ensure the counter reads 1. With the Jumelle ready,
To take an instant stereoscopic view
You need to:
1. cock the shutter.
2. Adjust the speed and set the appropriate apertures.
3. Focus if necessary.
4. Aim at the subject, keeping yourself steady and avoiding movement.
5. Trigger the shutter in two stages.
6. Retract the exposed plates and check the number indicated by the counter.
1. Cock the Shutter.
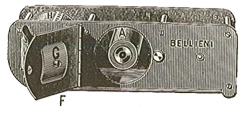
To cock the shutter, turn the knob C located at its center in the direction of the arrow until it resists.
2. The shutter speeds can be adjusted by tightening or loosening the brake F. The highest speed is marked 1, and the lowest is 5. To gauge the speed, look at knob C and trigger the shutter with the lens caps on. To change the apertures, hold the Jumelle with the lenses facing up. Place the first two fingers of each hand on the latch buttons of the bracket and bring the selected aperture number in front of the index in a beveled manner.
3. Focus if necessary. To focus, hold the Jumelle with both hands, lenses forward, and simultaneously adjust the two helical grooves with the first two fingers of each hand, as described for the apertures. Follow the movement of the index B on the scale E graduated in meters. The symbol ∞ indicates infinity.
4. Aim at the subject.
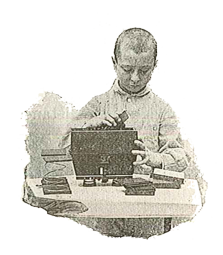
Viewing. — Typically, it is done as shown in the figure below
 , with the camera securely fixed to the forehead. In certain special cases, a small 45° movable mirror can be used to aim at chest level or at eye level from the side.
5. Trigger the shutter.
Shutter release. — It is necessary to release the shutter in two steps. This is a double-step release. Press the button until you feel a slight resistance. Wait in this position for the right moment, and the slightest additional pressure is enough to release it. This way, the release occurs without a jerk because the muscles are already contracted from the effort required for the first press. It's a good idea to practice this maneuver several times without taking an actual photo.
6. Retract the exposed plates.
It is essential to develop the habit of retracting the plates immediately after exposure. To change the plates, you need to pull the handle firmly, without fear, all the way, and push it back in the same way. Retraction occurs one plate at a time, so you need to pull it twice in a row after taking a stereoscopic view. Every time you retract a plate, the counter records it. After the stereoscopic retraction, it should therefore display an odd number. When all plates are exposed, the slider cannot function anymore. Therefore, it is impossible to make a mistake.
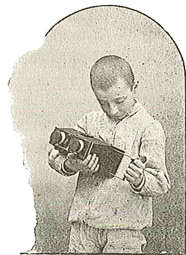 NOTE: Retraction can be done with the Jumelle held in any position. However, we recommend the position shown in the figure above.
To take an instant single 8 x 9 view
Always use the lens on the side of the slider compartment and leave the other one with its cap on.
All operations are the same as previously described. In this case, you only retract once.
To take a posed stereoscopic view
To take a posed shot, you need to use a tripod or a sturdy support. To set the shutter for a posed shot:
1. Turn the arming knob halfway. This first movement opens the shutter.
2. Push index H in front of the letter P. This second movement keeps the instant shutter open.
3. Finally, press the trigger button to activate the safety shutter, which is used for the pose. Maintain pressure for the duration of the pose. When the pose is finished, release index H from its position in front of P. The shutter is then returned to its original state. Subsequently, retract the plates as previously described.
To take a simple posed view
Operate exactly as you would for a posed stereoscopic view, but leave the cap on the left lens. In the case of a simple posed portrait, you can place the Jumelle on a tripod, securing it with the nut on the side, to utilize the larger plate dimension.
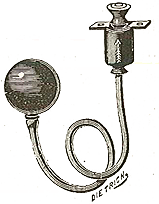
The Bulb. — To avoid any movement while taking a posed shot, it is more convenient and secure to use the bulb designed for this purpose. The bulb that comes with the Jumelle is equipped with a small blackened drum, on which an arrow is engraved. This drum engages by bayonet (with the arrow turned toward the lenses) into the two screws located on either side of the trigger button.
I recommend placing the bulb on the palm of your right hand and compressing it firmly with the fingertips. This recommendation is important due to the small size of the bulb, which cannot be compressed if held in the palm of the hand.
VERY LONG EXPOSURES
 The Fork. — In the case of a very long exposure, it would be very tiring to keep the bulb compressed. In this case, use a small fork-shaped piece that is engaged under the screw closest to the trigger button to keep the safety shutter open by compressing the button. Perform the exposure with the lens caps in this case.
The Tripod. — The Jumelle has two Congress-threaded nuts, so they can be mounted on a tripod, allowing for the larger plate dimension. We offer two special tripod models, which you can find specifications and prices for later.
PRECAUTIONS TO TAKE
to ensure and maintain the proper functioning of the instrument
Loading. — Every time you want to load the Jumelle after emptying it, it is advisable to turn it over with the lenses facing up and lightly tap the sides of the instrument with your hand. This precaution is intended to dislodge dust that might settle on the negatives and cause white spots.
Retraction. — The rods of the sliders slide in a double, well-fitted copper box lined with leather that tightly surrounds these rods. Light cannot penetrate through these sliders if they are well-maintained.
The retraction mechanism should remain very smooth. Occasionally, apply some vaseline to the slider rods to achieve this result.
Lenses. — Keep them in the cleanest possible condition. Wipe them with an old, fine, worn cloth. Never use leather that could scratch the lenses. The barrel holding the first lens can be easily unscrewed.
Iris Diaphragms. — If, for any reason, you have disassembled the lenses, you must carefully reassemble them according to their marks (indicated by arrows engraved on the shutter and lines drawn on the lens mount), and in their respective positions. It is easy to understand that, since the irises are connected to the lenses, it is necessary to maintain the position given during construction to ensure that the apertures remain identical. Therefore, you should check if the indications on the rings match those on the bracket.
Shutter. — Never apply oil to it; this would disrupt the speed adjustments.
To maintain the permanence of the brake adjustment, it is a good practice to leave the shutter at the highest speed when the Jumelle is not in use. You can adjust the shutter speed by tightening or loosening the motor spring.
To do this:
1. Arm the shutter.
2. Hold the knurled button firmly with the first two fingers of your left hand and unscrew the central screw with a properly fitting screwdriver.
3. Turn the knurled button to the right to increase the spring tension.
4. Tighten the screw firmly and test the speed.
Shutters are delivered well-adjusted, so this operation should only be done in cases of absolute necessity.
Plate Holders. — Take special care of this part of the camera if you want to maintain smooth retraction. In case you have crushed one of the edges, straighten it using a damaged plate as a lever. Avoid getting them wet. If this happens by accident, wipe them immediately. If you have difficulty removing a very thick glass plate, slide the tip of a knife between the bottom of the holder and the glass, and easily remove the pinched glass with your thumb and the blade.
The Light-Tight Plate Changing Bag
This indispensable accessory for the Jumelle allows you to carry a supply of glass plates and reload the Jumelle anywhere without the need for a darkroom. It is more convenient to have a set of spare plate holders in the bag.
Here is the order in which you should proceed:
1. Insert the loaded Jumelle and the box of plate holders into the bag. Put both arms through the openings, making sure to slide the rubber bands over the sleeves.
2. Open the Jumelle and remove the spring-loaded pads.
3. Take out the outer cover of the airtight box, turn the Jumelle upside down, and receive the exposed plate holders in your hand. Place them in the same order in the cover, which, being large, receives them without fumbling.
4. Replace the spring pad in the right compartment of the Jumelle and partially engage the cover.
5. Open the airtight box, take out the plate holders, and insert them into the left compartment, making sure to place them in the correct orientation, which is easily felt by touch.
6. Replace the pad in the left compartment and finish closing the cover.
7. Place the plate holders from the cover into the box, using the cover as a guide; close the box.
8. Remove the Jumelle from the sleeve and retract the first plate. These operations, which take longer to describe than to perform, are quick and easy after the first try. For added security, and even though the sleeve is light-tight, choose a location sheltered from too much light. Accidents could result from light rays entering through folds in the sleeves.
Tips for Achieving Good Photographs
In principle, we can say that most instant photos lack exposure, or more precisely, detail in the mid-tones. They tend to be overly harsh. To counteract this flaw, we have two methods:
1. Slowing down the shutter speed.
2. Using a wide aperture.
Slowing down the shutter speed. — The key to a good instant and complete photograph lies in choosing an appropriate speed for the subject's movement that you want to capture. There is no need to use an exaggerated speed when there is no subject moving in the frame.
Using a wide aperture. For the same reason, when possible, there is no need to stop down the lenses significantly. Remember that photographs taken with a small aperture have little depth and aerial perspective.
However, as the eyes looking through a stereoscope never examine all planes simultaneously but successively each of these planes, it is necessary for them to be sharp. Therefore, what should always be sought is a clear foreground without focusing, i.e., with the focus set to infinity.
| Aperture | 128 | 64 | 32 |
| from | 6 meters | 4 meters | 3 meters |
| To infinity | |||
In summary, we advise the amateur photographer to always use a pose, regardless of the subject, for the darker parts of the scene.
NEGATIVES
For negative development, follow your usual method and techniques.
We recommend developing the images 6 x 6 cm in an 18 x 24 cm tray and stopping the development only when the image becomes visible on the back of the plate.
POSITIVES
One of the obtained images is marked with a small notch, indicating their orientation. This notch is located inside the Jumelle and always helps to recognize the right side from the left side of the stereoscopic view.
Transposition. — Since the images are formed in the darkroom with the sky at the bottom, if you flip both images together to see the sky at the top, you will inevitably have placed the view taken by the left lens on the right side. However, to perceive the stereoscopic effect, it is essential that the eyes see the image in the exact same position as the lenses captured them. Therefore, you need to transpose the images and place the one captured by the right lens on the right side and vice versa. From the above, it can be deduced that, to view the images in an ordinary stereoscope with the stereoscopic effect, you must place the notches printed on one of the images on the correct side.
 Positive Plate Holders
The plate holder, specially designed for printing positives on glass, automatically provides the necessary transposition and eye separation for these positives. Here is how to use it:
The holder has a zinc frame inside it with spaces for both stereoscopic negatives. Place the negatives next to each other in the position they occupied in the Jumelle. This position is easily indicated by the aforementioned notch.
Insert the positive plate into the holder, carefully pressing it against the base and the right end of the wooden frame of the holder. In this position, you can see that the right image is being imprinted on the left side of the positive plate. Close the holder, then make this first exposure.
Repeat the process for the left image and make this exposure at exactly the same time as the right one.
POSITIVE PLATES
Positive Plates. — The best results are achieved with silver chloride glass plates. They can be handled under bright white light from a gas lamp or a lamp. Exposure is done using two equal-length magnesium wires, one for each exposure. Both wires are burned at the same distance from the plate. For an average exposure, use 5 centimeters of magnesium wire burned at 20 centimeters from the plate.
The developer can be the same as used for the negatives. Simply dilute it with an equal volume of water and add 10% potassium bromide, 25 drops per 60 cubic centimeters of the total bath. Fix and wash as usual.
NOTE. — A strong exposure results in red tones when developed in a very weak bath, while black tones are obtained in the opposite case. You can easily deduce the necessary data to obtain a warm and pleasant tone.
Special gelatin-bromide plates for lanterns are developed under red light in a slightly extended bath for negatives. They only produce black tones, and I recommend exposing them with a 2-centimeter magnesium wire burned at 1.5 meters from the plate. Positives for projections are obtained in the same way using the specially designed holder for this purpose.
Paper Positives. — If you want to print positive images from Jumelle photographs on paper, place the negatives in the specially designed holder in the following way: the notches on the inside and the two negatives on the same line. Print them on the same paper (18 x 24 cm cut into three pieces). Then, once the print is developed, toned, and dried, put it in the glass positive plate holder exactly in the slot where the negatives fit, with the image facing down. Place a 9 x 18 cm glass over it, replace the cover, and turn the holder. Use a knife to carefully cut around the two windows, then glue the cut images next to each other while transposing them.
NOTE ON DEVELOPMENT
Here is the development process that has given us the best results to date, both for negatives and positives:
| A | Dissolve 200 grams of pure sodium sulfite in 3 liters of distilled water, and once the sulfite is melted, add 15 grams of hydroquinone and 45 grams of metol.. |
| B | Dissolve 150 grams of pure potassium carbonate in 1 liter of distilled water. |
- For Instant Photos: Take three parts of A and one part of B.
- For posed photos, add B gradually. It is best to develop slowly by diluting A with twice its volume of water and adding a few drops of bromide.
- For positive photos using silver chloride, use the instant photo solution, to which you should add at least twice its volume of water and 20 to 30 drops of 10% bromide per 60 cubic centimeters of complete solution.
- For positive photos using bromide, use the instant photo solution and add 10 to 15 drops of 10% bromide per 60 cubic centimeters of complete solution.
- Negatives, like positives, should be washed and fixed as usual.
- We recommend adding approximately 10% liquid sodium bisulfite to the hypo solution. This addition helps maintain the clarity of the fixing bath, making it last longer and giving the plates a lot of gloss.
Mounting Positives
- To mount positives, follow the fastest method:
1. Take a strip of black gummed paper long enough to surround the entire image.
2. Wet it thoroughly on the non-gummed side by sliding it several times on a wet sponge or, preferably, on a vertically mounted dampener on a table, as shown in the figure. Only pass it once on the gummed side.
3. Spread it on a blotting paper sheet (gum side up). Place the image on the strip, starting from one of the longer sides, and continue to encircle the proof.
4. When you have completed the circle, cut off all the corners with scissors along the image. Then press it down with your fingers. It is convenient to write the title of the proof on the frosted glass with a very hard and pointed Faber pencil, on the right and at the bottom. If you have a catalog number, place it in the center.
Jumelle with film
- In addition to our glass plate Jumelle, we have created film Jumelle for travelers and those who wish to capture a large amount of sensitive surface without having to reload their instrument. This Jumelle are identical to glass plate Jumelle in terms of lenses, shutter, focus, and viewfinder. The only difference is the replacement of the retractable system with a roller frame.
Roller Frame
- The roller frame consists of three rollers, A, B, and C, and a blackened aluminum plate on which the sensitive surface slides. Roller A serves as the reserve for the film to be exposed. Roller B acts as a counter and marker.
 Finally, roller C is used to store the exposed film surface. To fulfill both the roles of counter and marker, roller B, with a circumference of exactly 18 centimeters, carries two sets of sharp-toothed combs at the ends of the same diameter of the roller.
- These combs, separated by a 9-centimeter arc, perforate the film at the limit of each single view. A counter advances by one number with each revolution of this roller, recording the number of shots taken.
- Roller C has a longitudinal slot where a lever is inserted over the end of the film strip, holding it fixed to the roller. This roller also has a ratchet wheel at one end to prevent it from turning in reverse and a maneuvering key at the other end to wind the film.
Loading and Operation of the Frame
- The frame is loaded in the darkroom.
 The film, pre-rolled on roller A, is inserted into the frame through door F. When this door is closed, the roller is securely held in place by spring G, which prevents the roller from turning too freely.
- Then, grasp the end of the film strip, pass it over roller B, then onto the aluminum plate, and finally secure it to roller C using the lever. There is nothing left but to insert the frame into the Jumelle and screw on the operating key to be ready to operate.
Essential Precaution
- To ensure proper tension of the sensitive layer, we recommend changing the exposed surface only at the moment of operation. The film, which tends to elongate in the open air, does not have time to do so, and you will achieve as perfect results as possible.
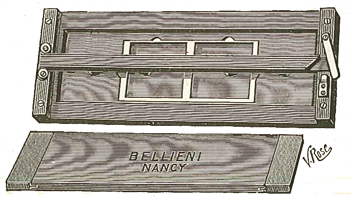
 Frame for Developing Films
- If you need to develop positives from film negatives obtained with the new roller frame Jumelle, it is advisable to use the special frame shown here. It has been designed to make this operation very simple.
- The operating procedure is the same as described on page 21, and you can easily see that it is possible to print the right image
 without any movement of the film, which is held in place by the left side of the movable flap. This latter frame is also convenient for printing projection views from film negatives and eliminates the need for the special projection printing frame.
Interesting links or bibliography :
Add a link or element of bibliography, a picture taken with this camera, a picture of box or an ads about this camera
Your photos taken with the same camera:
Cameras from Ebay France (Bellieni) (Uploaded each 3 hours)