


|
Traid Fotron III |
Manufactured or assembled in USA from (Circa) 1963 to 1971.
Index of rarity in France: Rare (among non-specialized garage sales)
Inventory number: 632
See the complete technical specifications
Chronology of cameras Traid
 La société Traid Corporation de Glendale en Californie, ne diffusa que trois versions d'un appareil photo s'appelant Fotron. Le nom du modèle est souvent confondu avec celui de la société.
Il est souvent dit que cet appareil était vendu exclusivement par des vendeurs faisant du porte à porte, cependant il apparaît dans le catalogue Montgomery Ward de 1963.
Les arguments du catalogue sont vraisemblablement les mêmes que ceux utilisés par les VRP. Avec cet appareil, les photos sont réussies dans toutes les conditions de prises de vue, avec un nombre très restreint de manipulations. Il a un flash électronique intégré, un moteur d'avancement du film, assurant le positionnement de la première photo, une batterie rechargeable. Le film est intégré dans une cartouche très facile à manipuler. La distance de prise de vue et l'ouverture se réglent automatiquement. Tout cela est possible grâce à l'utilisation de grosses touches. La première série de touches permet de choisir la distance de prise de vue : Far (loin), Medium (moyen) ou Close (près). Un modèle n'a que les boutons Far et Close. La seconde permet d'indiquer les conditions de lumière : Indoors (intérieur) ou Outdoors (extérieur). Le reste est géré par l'appareil.
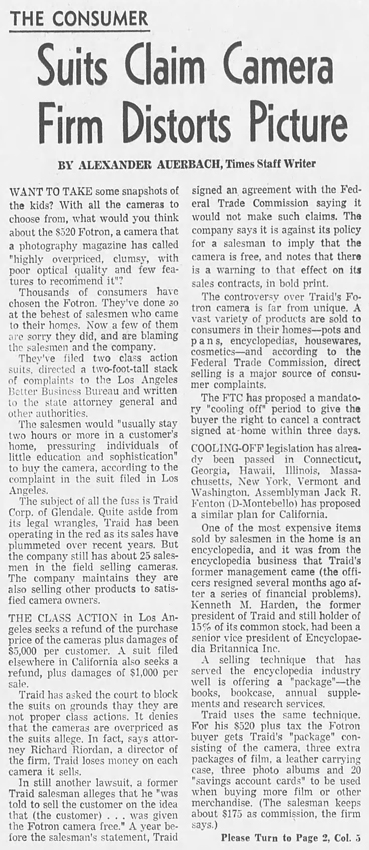
Les films ne peuvent être développés qu'en les renvoyant à Traid Corporation. Il s'agit d'un film 828 contenu dans une cartouche spécifique. L'appareil était innovant, mais terriblemen lourd, encombrant et très cher, plus cher qu'un Rolleicord. La piètre qualité des photos firent que de nombreuses poursuites furent menées contre Traid (article du Los Angeles Time du 25 avril 1971), au titre de tromperie. Dés lors, la commercialisation prit fin.
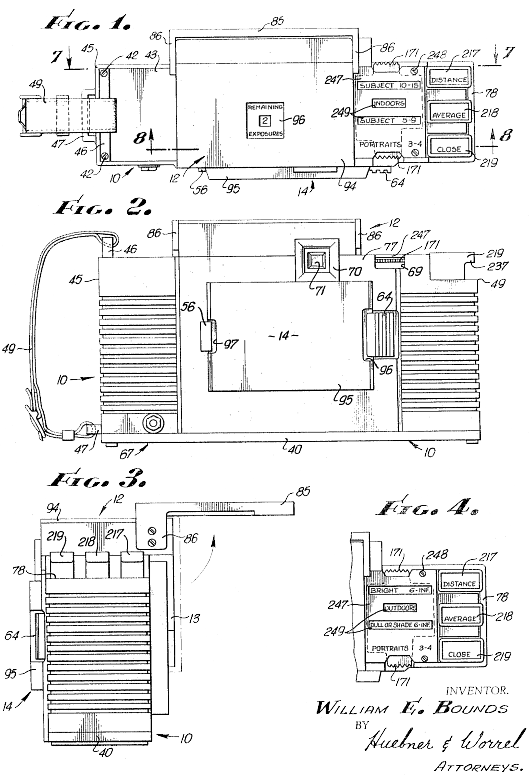
L'appareil était protégé par le brevet 3 296 949, déposé en 1961, par l'inventeur William E. Bounds. L'appareil y est très détaillé, puisqu'il y a 14 pages de dessins.
Ce brevet fait quasiment exception parmi les inventions de W. E. Bounds qui habituellement dépose des brevets pour des moulins à poivre, distributeurs de condiments, râpe à fromage, appareil à givrer les verres ou pour un appareil à ... secouer les drapeaux. On trouve cependant un flash électronique (2 868 958). Vous trouverez facilement sur Amazon, la marque Williams Bounds.
The Fotron III is a slightly simpler version, and therefore probably less expensive. Distance adjustment is only possible by choosing Far or Close. The Medium key does not exist.


Instructions
Your Fotron Camera comes to you with sufficient charge to shoot three Snap-load magazines of film. In the event you are not ready to take pictures when you receive the Camera, put it on charge until you are ready.
Charging your Fotron
Always push the OFF Button down if there is any time lapse between shots, also after finishing each magazine of film. In other words, the OFF button should always be DOWN when the camera is not in use. We have supplied a charge cord which you will find in the top of the shipping carton along with your film discount stamp book and three magazines of film. When you are not taking pictures, and electric current is available -*(standard 115V AC) insert the plug into the bottom of the Camera and connect the cord to a wall outlet. A small red light adjacent to the plug will tell you that the Camera is charging. THIS CAMERA MAY BE LEFT ON CHARGE AT ALL TIMES WHEN NOT IN USE. IT CANNOT OVERCHARGE, BE SURE TO PULL THE PLUG FROM THE BOTTOM OF THE CAMERA BEFORE ATTEMPTING TO TAKE PICTURES AS IT WILL NOT OPERATE WITH THE PLUG IN. — If the red light does not go on when the cord is plugged into the wall outlet and the Camera, you have either a poor wall connection or the cord is defective. Cords are thoroughly tested before they leave the plant but should one fail to charge the Camera, notify us immediately and we will ship a replacement. *if you plan to take your camera into state or country where voltage is other than 115V AC, please contact Traid Corporation for advice. We stock a simple Step-down transformer and suitable plugs for your convenience. Keeping your Camera on charge when not in use is most important. This insures a "READY" Camera at all times. Ready for that unusual, once in a lifetime shot, and ready for the unplanned vacation trip. You will find that the small red neon light on the bottom of the Camera provides a good night light when placed near a phone, or on a night stand.
Insert and removing Snap-Load magazine
Caution - After removing Snap-load from film box and styrene container, be sure to check the under side for the Word "UNEXPOSED" printed in white on the black paper leader. If you will always check to be sure this printing shows you will eliminate the danger of inserting a "used" or "exposed" magazine back into the Camera. Nothing will happen to injure the pictures you have already taken, but you will be taking pictures without any film, as this has already advanced across the magazine to the take up spool. Also, it is easy to send in the wrong roll for processing, so make sure that the word "UNEXPOSED" does not appear on the under-side of any magazine you are preparing to ship to the laboratory for processing,
To Insert a Snap-load magazine, lay the Camera face down with base toward you. Set Snap-load in recess in back of Camera, With thumbs, press release clamps toward sides of Camera. Snap-load will drop into recess. Press the right hand side of the magazine into place first and make sure the clamp is firmly seated in the Snap-load dépressions - then press the left hand side into place and make sure the clamp is firmly seated. The motor will start running when you press the left hand side of the magazine into place. DO NOT BE ALARMED; JUST MAKE CERTAIN THAT BOTH SlDES OF THE MAGAZIE ARE FIRMLY SEATED UNDER THE CLAMPS. Motor will continue to run until film has advanced to the first picture you are going to take. White arrow in center of dial on top of Camera will then point to number "10", which is your first picture. Each time a picture is snapped motor runs and arrow is advanced to next lower number, telling you how many pictures remaïn. (ONCE SNAP-LOAP IS IN PLACE DO NOT REMOVE UNTIL ALL 10 PICTURES HAVE BEEN TAKEN, ARROW HAS ADVANCED FROM THE #1 PICTURE POSITION TO A 6 O'CLOCK. POSITION AND MOTOR STOPS RUNNING. To remove the Snap-load, press the release clamps on either side. Magazine will snap out and motor will run for about three seconds, advancing the arrow to the point where the Camera is ready to receive the next Snap-load magazine. Mail your finished magazine to Processing Lab, as per instructions on film box. A small green "Re-order" envelope is provided with each magazine. Always use this envelope for film or reprint orders. DO NOT send film orders, reprint orders with checks in the box containing the magazine you are sending to the lab for processing.
DON'T FORGET....PRINT- YOUR NAME AND ADDRESS CLEARLY END FLAP OF EVERY SNAP-LOAP MAGAZINE MAILER YOU SEND TO THE LAB FOR PROCESSING. THIS IS OUR ONLY MEANS OF IDENTIFYING YOUR PICTURE5.
Pictures with your Fotron
Before taking any pictures familiarize yourself with the buttons on the Camera... the two top buttons near the 0FF button, marked INDOORS and OUTDOORS, and the two lower buttons marked CLOSE and FAR. You will note that when you press the INDOOR button the reading next to the CLOSE button is 4-8 feet and the reading next to the FAR button is 8- 12 feet. It is suggested that you measure, and use the exact footage specified. Once you become familiar with the Camera you will find yourself able to judge these distances without measuring. Sunny days are always best for outdoor pictures. This is especially true in the case of distant, or infinity shots. Use INDOOR button for medium or close pictures on extremely dull days - in deep shade - and for night pictures outside.
Example of how to take an INDOOR picture: Assuming you have loaded your Fotron with a Snap-load magazine and the arrow points to the number 10, you are now ready to take your first picture :
| ONE | PRESS THE INDOOR 8UTT0N |
| TWO | CHECK FR0NT 0F CAMERA AND WAIT FOR LIGHTS ON EITHER SIDE 0F LENS OPENING T0 BLINK AT LEAST FIVE TIMES |
| THREE | CHECK DISTANCE BETWEEN SUBJECT AND CAMERA AND DETERMINE WHETHER YOU SHOULD PRESS CLOSE OR FAR |
| FOUR | RAISE CAMERA TO EYE LEVEL AND CENTER EYE SO THAT YOU SEE THE ENTIRE RED BORDER IN THE VIEWFINDER FRAME. BE SURE SUBJECT IS WITHIN THIS FRAME. |
| FIVE | PRESS BUTTON YOU HAVE DETERMINED TO BE RIGHT FOR DISTANCE BETWEEN SUBJECT AND CAMERA. |
Interesting links or bibliography :
Add a link or element of bibliography, a picture taken with this camera, a picture of box or an ads about this camera
Your photos taken with the same camera:
Cameras from Ebay France (Traid) (Uploaded each 3 hours)